
I made a cloak for the Colorado Renaissance Festival. At the same time, I've been practicing french braiding my hair because the skill has eluded me for the first 20 years of my tomboy life. By some odd coincidence, the combination of the two makes me look a bit like Obi-Wan which would be a much appreciated compliment if only I was a man. :(
On another note, I'm really, fricken excited to finally go to the Renaissance Festival. Holy hell. I've never been to one before and Curtis, the boyfriend, said we could go to the Colorado Renaissance Festival when I come up to visit him next month! Unfortunately, this means that my room smells funky due to the ever-growing pile of leather scraps and animal parts waiting to be used for my shaman costume.
But I know why you're here. You want to know how to make a cloak. Let us begin.
How to make a Cloak:
Materials:
- 2-3 yards of fabric
- A yard of ribbon
- Scissors, chalk, thread, iron, sewing machine etc. etc.
- A couple of hours of your time
Step 1: Lay out your fabric, mark the length and cut
 |
| Figure 1 |
I folded my fabric in half because I had a small work area.
First, find how long you want the cloak to be from your shoulder to your legs, or floor. Use a tape measure, hang it off your shoulder and pick a number. I went with 42 inches, including a half inch seam allowance. I'm short so this goes to mid-calf for me.
Mark this length on your fabric. You should have a line marking this length from selvedge to selvedge. (The selvedge will be the front of the cloak, the cut edges will be the top and bottom.)
Cut the fabric. I wasn't very careful when I cut because I wanted a ragged look anyway, but a clean, straight ling will make hemming the fabric much easier.
Step 2: Mark and cut out the hood
 |
| Figure 2 |
With your excess fabric, fold it in half and lay it out. The top of the hood will be on the fold, the front will be the straight cut edge as you can see in Figure 2.
For this hood, I made it about 18-19 inches tall and 17 inches deep. Figure 3 says 19.5 inches tall and as I type this, I feel like that might have been too much. I think it was closer to 18.5 inches. Sorry.
 |
| Figure 3 |
Mark how tall and deep you want your hood to be, include an inch for seam allowance, then draw the back of the hood. As you can see in Figure 3, I went with a slightly rounded curve. (This is the line right under the words 'mark and cut'.) If you want more of a witchy/elf hood, you can always make the back of the hood more of a long triangular shape.
After you have drawn out your hood, cut it out. Your two sides should still be connected through the fold at the top of the hood.
Step 3: Sew together the back of the hood
Pin the back of the hood together, right sides facing together.
Sew the pieces together with about half an inch seam allowance.
 |
| Figure 4 |
I went back and did a second stitch with a zig-zag stich in the seam allowance just to strengthen the seam and prevent fraying. You can finish the seams however your choose.
Step 4: Hem the front of the hood
Hem the front of the hood by folding over about half of an inch, ironing down and then topstiching about 3/8ths of an inch away from the edge.
 |
| Figure 5 |
Step 5: Hem the front of the cloak
Set your hood aside and go back to the first piece of fabric you cut at the beginning of the tutorial to create the length of the cloak.
Hem the selvedge. I did this by folding over half an inch, ironing this in place and then topstitching about 3/8ths of an inch away from the edge.
 |
| Figure 6 |
Step 6: Gather the top of the cloak
 |
| Figure 8 |
Make a long, loose basting stitch across the top of the length of the cloak about a quarter of an inch away from the edge.
Then, pull on one of the threads to gather the fabric. Be careful not to snap the thread, this can be annoying to redo.
Or do whatever you want to gather the top of the cloak. I'm not your mom.
Step 7: Pin the hood and gathers and sew together
Align the top of the gathers with the bottom of the hood. You want to keep gathering until the hood and the cloak at the same length, from edge to edge.
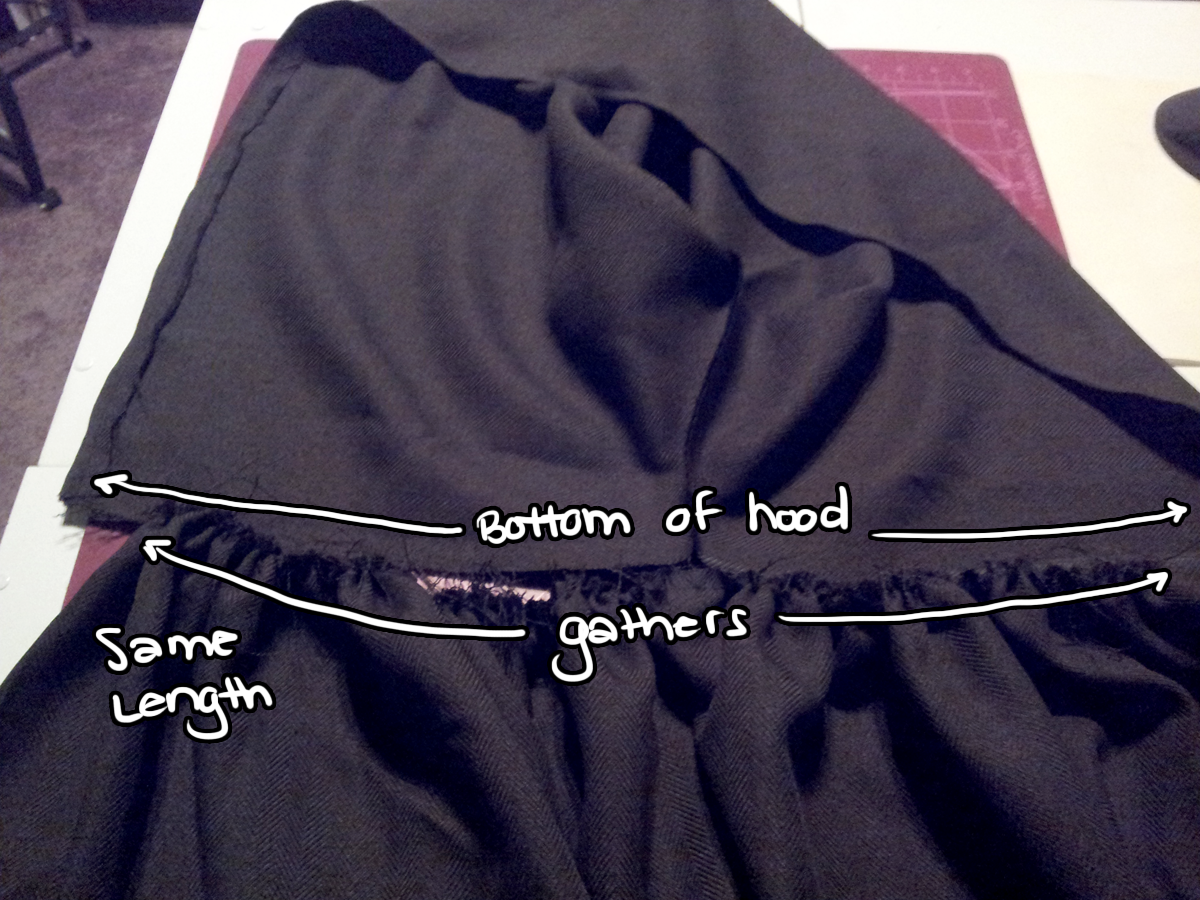 |
| Figure 9 |
Again, I used a zigzag stitch to reinforce the seam. You can remove the basting stitch and trim any excess or finish the seam however you like.
Step 8: Top stitch the gathers
I ironed and top stitched the seam allowance to the hood, just to keep it out of the way and help with the fraying. (This fabric frays a ton.) This area will show because it will be loosely hanging around your shoulders, so do whatever you want to make it look nice.
 |
| Figure 10 |
Step 9: Attach the ribbon/closure
I decided to use some chocolate ribbon to tie my hood shut and keep it in place while I wear it. You can use fancier closures or whatever you want. To attach the ribbon, because I wasn't doing any fancy finishes, I just used a zig zag stitch to bar tack the ribbon to the hood/gathers seam.
 |
| Figure 11 |
I didn't hem the bottom of the cloak because I was going for a ragged feel. However, the fabric I'm using frays much worse than most fabrics (leaving little strings wherever I go) so I'm contemplating hemming the bottom.
This cloak doesn't have any fancy seam finishes or lining, but if you are using a fabric that frays a lot it may be something you want to consider.


Update: I remade the cloak and I'll be uploading better pictures once I get my hands on some. Thanks for your patience. :)
Step 10: Enjoy and have a photoshoot with your puppy!

Zoey got a little curious while I was trying to take photos of the cloak...
In this picture I was a little worried because it seemed like she was going to pounce and try playing with the girl in the mirror.
7 years of bad luck with a husky puppy? No, thank you. She's clumsy enough as it is.

And if you're wondering if that is indeed Zoey's cute little butt in this picture, you'd be correct...
As you might be able to tell in the photo, this fabric frays pretty easily. I was thinking of doing a lining but I figured that it wouldn't go with the nomadic shaman costume I was going for.
I plan on finishing the rest of the costume (and possibly uploading tutorials for everything else I do!) so keep an eye out for that! This is just the beginning and I promise you the other pieces will be much more interesting.
Update: I remade the cloak and I'll be uploading better pictures once I get my hands on some. Thanks for your patience. :)